Thursday, October 17, 2013

★ Simple DIY Curtain ★

Good morning,
I have completed quite a few projects recently, but I'm sharing them one by one in order to spread them out.  It might be awhile until I complete my next one, as it's pretty large.  Unless you know already I don't think you'll guess what it is :)

This projects came to me on a whim.  Since we moved into our house 2 years ago, it has been a nightmare trying to find a curtain that fits the window on our kitchen door.  There was a hideous green and white frilly one there when we moved it, and that just couldn't stay... and leaving it uncovered was not an option, since I have a fear that someone is going to decide to come to the kitchen door and watch me.
After searching a seemingly endless number of stores (including online stores), I got frustrated enough that I bought a clearance curtain panel from Kohls and cut it (sloppily) to size.  It was there for almost 2 years.  When we finally painted our doors a few weeks ago, the mismatch in color started to bother me.  I wanted to get a different curtain that's color would match both the kitchen and the door (the old door was white, the kitchen is green, and the old curtain was green).  I got some homespun fabric the other day with a different project in mind, but when I walked by the kitchen door that night inspiration struck me.


It came out very cute and it was easy.  If you can sew (and have a little patience) you can do this!  I just had to cut the fabric to size, sew it to allow the curtain rod to slip through, and hem the sides.  Voila!  A cheap and easy curtain solution!


Wednesday, October 16, 2013

★ Art Show & DIY Vintage Milk Bottles ★

Hi everyone,
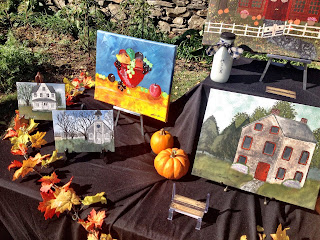
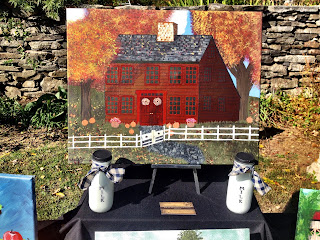
Well my Art Show was Saturday and I'm sorry to say it was kind of a bust.  Through no fault of my own, mind you.  I had a bunch of people who were planning to come around 1-2, but I ended up packing up at 12.  Oh well, there will be others!  I did manage to take some photos of my table.


My haunted house painting is missing from the table because it was with the other raffle items.  I don't know who won it (there were a few bids on it), but I hope it went to a good home!  I must say that after the fact, it was difficult to see it go.  But the proceeds went to a good cause.

You'll notice on my table the little milk bottles that I made on Friday night :)  They are even cuter in person and super easy to make!  Here is what you need:

- Empty "Starbuck's Frappuccino bottles" (you know, the ones they sell in grocery stores)
- Black & White Acrylic Paint
- Long paint brush
- Homespun fabric (for ribbon)
- Sharpie

1. Drink the Frappuccino (the caffeine will motivate you!) and clean the label off the bottle.  I soaked the bottle in hot water in my sink, peeled off the labels, and they scrubbed the sticky goo with an S.O.S. pad to get everything off.  It was pretty easy.
2. Paint the lid of the bottle black (or another color of your choice.  You'll need 2-3 coats of paint.)
3. Get a long paint brush that is thin enough to fit into the bottle.  I used a 1" flat brush and it worked pretty well.  Paint the entire inside of the bottle with the white paint.  Allow to dry a little bit and paint with a second coat.  (Since it's inside the bottle, the paint takes awhile to dry.  I wasn't patient enough to let it dry completely before doing the second coat, but it turned out fine.)
4. Cut a ribbon out of some homespun fabric.  I got mine at Joann Fabrics.  Tie around the neck of the bottle.
5. This step is obviously optional... the bottle looked too plain when I was finished, so I decided to write "MILK" on it with a sharpie.  I think it's cute!

Definitely a quick & easy Friday night craft project!


Thursday, October 10, 2013

★ Don't forget! Art Show this weekend! ★

Hi everyone,
I know it has been awhile since my last post, and for that I apologize.  I've had quite a bit going on that has kept me preoccupied... BUT I'm very excited because this weekend I am participating in my first art show!  Please stop by and show your support.  I will be raffling off this painting.


I will be announcing the winner on my facebook page on Monday, October 14th.  I also had some cards made up that I'm going to give out on Saturday.  I hope to see you on Saturday!  I've listed the details again below:

Date: October 12, 2013
Time: 10AM - 4PM
Location: Roseledge Country Inn & Farm Shoppe
                418 Jewett City Rd. (Rte. 164), Preston CT 06365
Inn Website: http://www.roseledge.com/


Thursday, October 3, 2013

★ Painting: Crossed Keys Tavern ★

Only one more day...
I'm in the midst of battling a miserable cold, and ended up staying home yesterday to rest.  Resting seems to consist of either sleeping or sitting there like a lump thinking about how lousy I feel... so I needed to do something to pass the time.


I modeled it off a photo of the old Crossed Keys Tavern in Ohio.  I was looking for inspiration, and stumbled upon the building.  It was built in 1802.  It definitely helped to keep my mind off of being sick yesterday.

Tuesday, October 1, 2013

★ Painting: "Abandoned" ★

Good morning everyone,
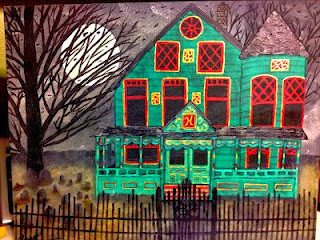
I got a few suggestions to paint a house with a Halloween theme.  I thought it seemed appropriate, since Halloween is creeping up fast!  I played around with a few ideas in my head, and took some suggestions that I received regarding my overall painting style into consideration (adding animals, etc).  I ultimately decided that a good subject for a "haunted" house would be one of those big, beautiful Victorians.  I know of 3 elaborately decorated Victorians within 2 miles of our home (plus at 3 least more that aren't so elaborate), so we drove by them for some inspiration.


This last photo is of the old Wallingford Victorian Bed & Breakfast.  It is currently on the market and I would LOVE to buy & re-open it.  Unfortunately we don't have an extra $750,000 laying around.  Shucks.  I actually think that's a good price for a fully renovated, 6093 square foot 1891 historic Victorian home with 7 bedrooms and 7 bathrooms... but nevertheless...

I knew that the painting was going to be a nighttime one, so I wanted some color in the house so that it stood out.  These Victorians are also notorious for elaborate, over-the-top details in them.  I knew that if I was going to paint a Victorian, it was going to be a "go big or go home" situation.  Andy & I both liked the colors in the first house photo, so I based my color scheme off of that one.


Overall, I'm happy with it.  I didn't plan on finishing it yesterday, but I took a half day at work because of a wicked sore throat, and finishing this helped me keep my mind off of the pain.
I added a spooky old graveyard for effect.  I got the inspiration from the old graveyards around, where the stones are asymmetrical (and some are literally just rocks).  I think I was successful in making it look old.  I also added random bats throughout the sky, and of course, a full moon.
I tried to brainstorm about what I could add to it, and thought about adding a black cat on the porch, but I thought that it might look a little too forced or obvious.  I like subtleties in paintings.  I didn't want this one to scream out "HEY!  I'M A HAUNTED HOUSE ON HALLOWEEN!"  I merely wanted it to be suggestive.  That's also why I didn't put Halloween decorations in front of it.  I really wanted this house to look like it had been abandoned, maybe recently.  I think my attempt was successful.  If I were walking a secluded area at night and came across this house, it would certainly send a shiver up my spine, and I would wonder what stories this house might have to tell...